TimberTech Impression Rail Express, or IRX, is a popular aluminum railing used on decks around the Pacific Northwest. We install it often, here’s our advice on installing it efficiently and cleanly.
Here we go over it in a step-by-step guide, but if you'd rather watch, the full video is right below.
This guide also works for Aria, Harmony, Williams and UltraLox railings, which use similar components and assembly methods.
These are our methods. If in doubt, refer to official installation guides from the Manufacturer.
What You'll Need
Miter saw with a carbide non-ferrous blade (made for cutting aluminum)
Drill with a 3/16" bit, and a speed square
Level, tape measure (a laser distance measure is even better), string line and a rubber mallet
A marker that wipes off easily, like a Pica Dry with white lead
6x6 pressure treated blocking under each post, and 5/16”×6" structural screws for the posts (I use GRK or Power Pro, rated for ACQ treated lumber)
Touch-up paint for scratches
Suggested
Omni-Jig and Post Layout Jig for standard installations
45° Corner Jig and 22.5° Square for decks with 45° corners
Adjustable sawhorses to make a flat cutting table next to the saw
Step 1: Install Blocking Under Every Post
IRX posts are typically surface mounted after decking is installed. Structural screws are installed down through the post base into solid blocking in the deck frame. We like to use 12-14” sections of 6x6 pressure treated lumber. We install these securely during framing to give us a solid base to anchor to, as well as a little wiggle room in where we place our posts. We recommend using at least 18 exterior grade framing screws or HDG framing nails, or similar, to tie each piece of blocking to the deck frame. Screws tend to result in a more stiff anchor for less flex in the final product.
Step 2: Set Up and Check Your Material
Before you start, set your miter saw up with adjustable sawhorses or supports on each side to make a flat, level table. IRX panels are long and awkward, and a good cutting setup makes tight cuts much easier, especially if you're working alone.
Then unpack everything and look it over. Check for scratches or bad spots in the powder coat before anything gets installed. I always order a little extra just in case.
Step 3: Lay Out Your Posts
Set your posts so that the outer holes in each post land centered in the rim joist.
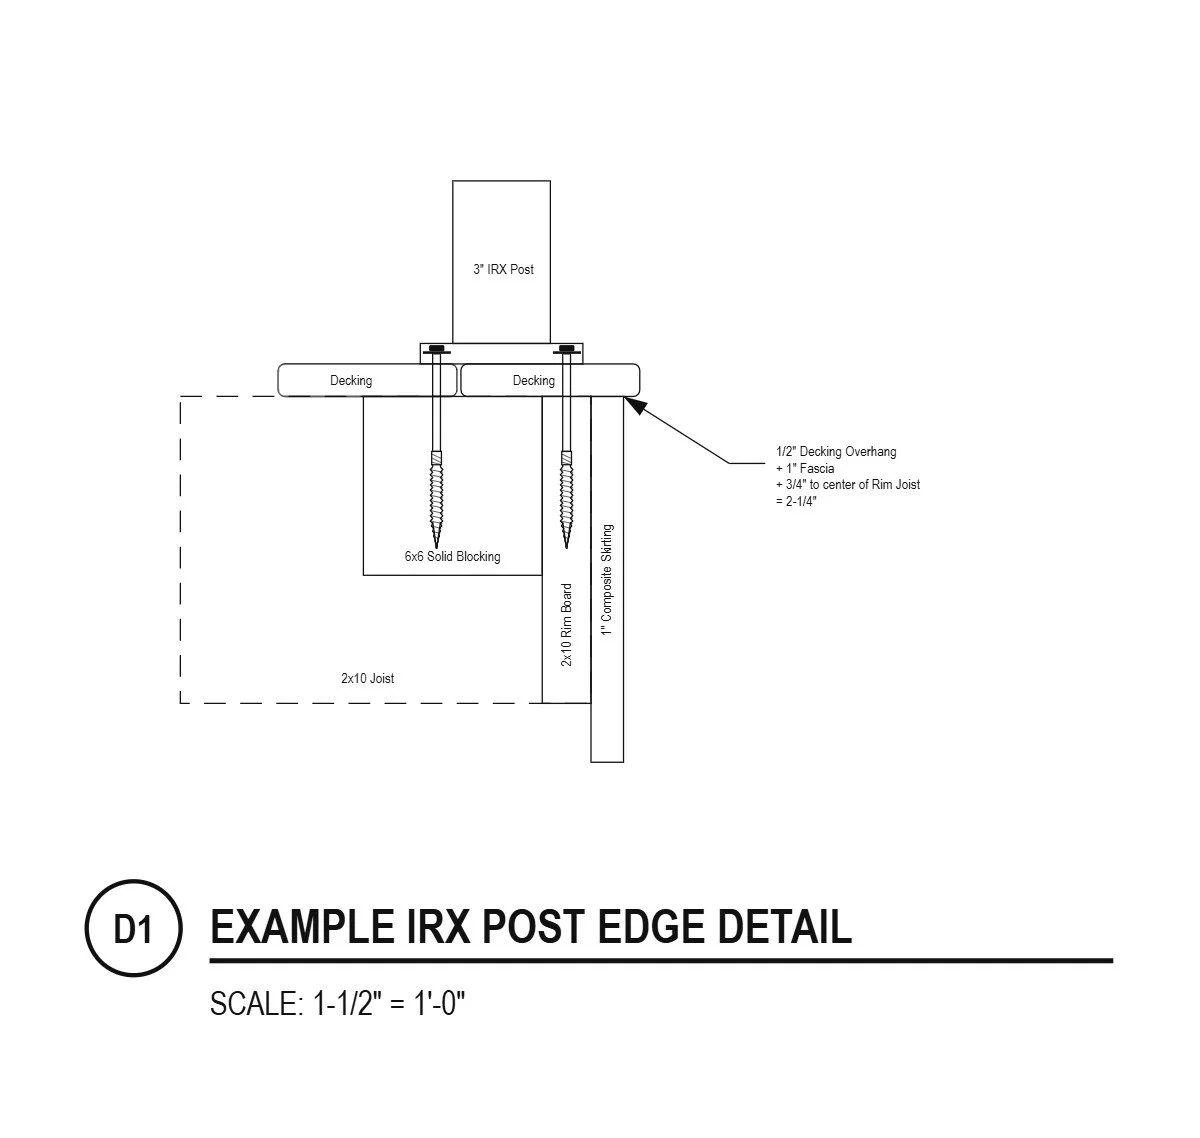
On the deck in the video, the decking overhangs 1/2" and the skirting is 1" thick, so the rim board is 1-1/2" back from the edge. I added 3/4" to that, so the outside screw lands 2-1/4" in from the edge of the decking, centered in the rim board.
A few layout rules to plan around:
Find your end and corner posts first, then divide the distance between them evenly. When laying out posts, double check your spacing.
Use 3" posts at every start, end, corner and transition. 2" posts can only go in-line, between 3" posts, on a run with a continuous top rail (available in 18’ lengths max)
Keep posts no more than 8 feet apart on center on level runs.
An 8 ft panel is not actually 96" long. It's 8 ft with the posts counted in (the panel itself is 91.31", and a 6 ft panel is 69.43"). Plan your spacing with that in mind.
When placing a post at the house, ensure it leaves less than a 4” gap between the house and post to stay within deck code.
Using Post Layout Jig: use a speed square to set the jig square to the edge of the deck, then slide it in or out to set the distance from the edge. Drill through it with a 3/16" bit. This makes locating and pre-drilling posts quick and easy.
Tip: If you're doing a drink rail, cut your posts down now. See the Drink Rail section below.
Step 4: Install the Bottom Clips
You can install the bottom clips before or after the posts go down, and both ways work. I usually do them before, while the posts are easy to get at. Installing them after the posts are mounted helps you avoid putting a clip on the wrong side of a post.
Without a jig, measure and mark each clip, center it on the post, predrill each hole, then drive two self-drilling screws.
With the Omni-Jig:
Place the jig on the post, tight to the base, with the open end toward the base of the post.
Place the clip in and fully seat it against the post.
Drive two self-tapping screws to fasten the clip to the post.
Step 5: Mount and Plumb the Posts
Pre-drill with a long 3/16" bit (skipping this step leads to difficult structural screw install and even broken structural screws) and get all the structural screws in first, lightly tightened to see where the post ends up without shims.
To plumb the post, back off the screws on the side it needs to tilt away from, shim that side, and tighten it back down. I like these composite shims because they're color coded by thickness (1/16", 1/8" and so on) and come as thin as 1/32" for fine tuning. Some tips:
Over-shim a little. Tightening the screws crushes the shim slightly so shimming just to plumb will often not be enough once the screws are fully tightened.
Trim the shims flush at the base with a utility knife. The post skirt hides them.
A rubber mallet works well for slightly adjusting the post alignment while the screws are partially snug but not fully tight.
Check for square as you go, so the panels meet the posts cleanly.
Plumb the end, corner and stair posts both ways. For the posts in between, plumb them along the run, then run a string line between the end posts and bring the tops in or out to the string. The top of the railing being straight is what catches your eye, so straight takes precedence over perfectly plumb here.
Step 6: Measure and Cut the Panels
Always measure at the bottom, between the posts, since the bottom won't move. A laser distance measure makes this faster and more accurate.
TimberTech recommends cutting panels 1/16" to 1/8" short. I cut mine exactly or 1/32” shy, test fit, and shave a little off if needed. A short cut leaves a gap you can see, and I like everything tight.
Keep the top rail (or snap cover) on the panel when you cut, so everything gets cut at once and lines up.
Getting the balusters even on both ends:
Find the center point of your opening and on your panel, see if it lands near the middle of a gap or the middle of a baluster, and pick whichever leaves even spacing at both ends. The balusters are spaced 3-7/8" apart.
Mark and make your first cut. Then, on that same side, measure the second cut from the first cut, not from a baluster. That keeps the panel length accurate.
For the other side of the panel, on your first cut, match the distance to the first baluster, then again measure from this cut to make your final mark and cut.
Clean up any burrs on the cut edges with a file or some sandpaper to help avoid scratches while installing panels.
Step 7: Install the Panels
Take the top rail and bottom cover off the panel. (Tip: keep track of these by marking with a white Pica Dry pencil in an unseen area)
Set the panel on the bottom clips, push the panel down tight on the clips and screw it to the clips (2 screws/clip).
Shift the top ends of the panel to center in the post, pushing posts apart if necessary for slightly more room. Set the Omni-Jig on top to center the panel or center manually. Pop a clip into the u-shaped channel at the top of the panel and push the clip tight to the post. If there is a slight gap, using a clamp at the top of a baluster and the post can help pull everything tight.
Screw the top clip to the post, then screw the panel to the clip. Do the other side.
Step 8: Add Support Blocks
Any section longer than 4 feet needs a support block under the middle of the bottom rail. I put one under 6 ft sections and two under 8 ft sections. One support block under an 8 ft section still leaves more flex in the top rail than I'd like and in my experience can cause the bottom snap cover to pop off if the railing is leaned on heavily, so I order and install a few extra.
Center each block under a gap or directly under a baluster so it looks intentional.
Sight down the rail. If a block makes the rail hump up, trim the bottom of the block until it sits flat.
Installing the support block - mark the inside of the block on the deck on two corners, about 1/4” inside the edge of the support block, then drive a composite deck screw at an angle just inside that line, leaving it up about 1/8" to 1/4". The block slips over it and can't slide sideways. Then fasten the block to the lower rail cover with the color-matched screw.
A small spreader makes it much easier to lift the rail and slip the block in.
Step 9: Top Rail and Rail Covers
The top rail and rail covers snap on by hand, although some top rails may benefit from some clamping. Just make sure each section is fully snapped together or it may run the risk of “unzipping” and coming loose. If you have lighting wires running through the channel of the panel, hold off on the top cover until the wiring is done.
Step 10: Stair Railing
Stairs are the trickiest part of IRX, so take your time here. I highly recommend watching the following video for the best explanation of this process.
The Omni-Jig holds stair clips centered and has a viewing window which makes aligning clips to your marks much easier.
Step 11: 45° Corners
For a 45° corner, the corner post gets set at 22.5° and splits the corner, and the panels attach with 22.5° clips. Another, slightly bulkier method is to double post these corners.
22.5° Square: quickly lines up your posts for 45° corners and makes fast, repeatable 22.5° marks.
45° Corner Jig: holds 22.5° clips centered with no measuring as well as templates for marking and cutting each railing component at a 22.5° angle.
Optional: Adding a Drink Rail
A drink rail is a deck board run on top of the railing, wide enough to set a drink on. It's one of my favorite upgrades.
Use a full-thickness board. Scalloped boards don't work well here. A 5-1/2" board on a 3" post overhangs 1-1/4" on each side.
Use 3" posts only. 2" posts are too short to use with a drink rail.
Drink rail clips go at the ends and about every 2 feet. That's 4 clips on a 6 ft panel and 5 on an 8 ft panel. Snug the screws up, don't overdrive them, or the clip will bend.
Fasten from underneath. The screws go up through the clips into the board and don't come through the top, so everything is hidden.
Paint the screw heads on black or bronze railing so they blend in. I lay them on a sloped piece of plywood so the heads all face one way and spray them with Rust-Oleum High Performance Enamel.
Tight miters: PVC decking glues well, so I glue miters with CA glue (super glue) and add one stainless steel pocket screw on each side, using a Kreg jig, centered so the holes are hidden underneath. It keeps the miter tight for years. Composite boards don’t handle gluing so well, so I maintain a gap with these.
Leave a small gap anywhere the board butts into a wall or solid surface.
Finish Up
Put the post caps on once the panels are in. Install the post skirts last, after the whole railing is done. Then go over the railing and touch up any scratches in the powder coat.
Common Mistakes We See
Large gaps where panels meet the posts
Railings not centered on posts
Posts that aren't plumb, or tops that weren't string-lined straight
Inconsistent post layout
Tools I Use
The jigs in this guide are ones I designed for our own IRX installs: the Omni-Jig, Post Layout Jig, 45° Corner Jig and 22.5° Square. You can find all of them on our Railing Installation Tools page.
FAQ
Q - Do I need a jig to install IRX?
A - No. You can measure and mark each clip by hand, it just takes longer. A jig sets every clip in the same spot.
Q - Does this work for Aria railing from Home Depot?
A - Yes. Aria uses the same posts, clips and panels as IRX, and our Omni-Jig, Post Layout Jig and 45° Corner Jig fit it.
Q - How far apart can IRX posts be?
A - No more than 8 feet on center for level runs. Stair runs can go up to 8’ on center, though I prefer a max of 6 ft
Q - Should I cut IRX panels short?
A - TimberTech recommends 1/16" to 1/8" short. I cut them exact and shave if needed, because a short cut leaves a visible gap.
Q - How many support blocks does IRX need?
A - Any section over 4 feet needs one. I use one under 6 ft sections and two under 8 ft sections.
Q - How tall should the posts be for a drink rail?
A - Cut them to 36-7/16", measured from bottom of the bottom plate.
Q - Can I use 2" posts?
A - Only in-line, between 3" posts, on a run with a continuous top rail. Never at an end or corner, and not with a drink rail.
Some links in this post are Amazon affiliate links. If you buy through them, I may earn a small commission at no extra cost to you.
Want It Done for You?
IRX is a great system once you get a rhythm going. If you're in Snohomish County or North/East King County and would rather have it installed for you, we'd be glad to help. Get a free estimate.